Restructured Text (RST) Snippets
Restructured Text snippets and code completion hotkeys for Sublime Text 2 and 3
Details
Installs
- Total 15K
- Win 5K
- Mac 5K
- Linux 4K
| Apr 25 | Apr 24 | Apr 23 | Apr 22 | Apr 21 | Apr 20 | Apr 19 | Apr 18 | Apr 17 | Apr 16 | Apr 15 | Apr 14 | Apr 13 | Apr 12 | Apr 11 | Apr 10 | Apr 9 | Apr 8 | Apr 7 | Apr 6 | Apr 5 | Apr 4 | Apr 3 | Apr 2 | Apr 1 | Mar 31 | Mar 30 | Mar 29 | Mar 28 | Mar 27 | Mar 26 | Mar 25 | Mar 24 | Mar 23 | Mar 22 | Mar 21 | Mar 20 | Mar 19 | Mar 18 | Mar 17 | Mar 16 | Mar 15 | Mar 14 | Mar 13 | Mar 12 | Mar 11 | |
|---|---|---|---|---|---|---|---|---|---|---|---|---|---|---|---|---|---|---|---|---|---|---|---|---|---|---|---|---|---|---|---|---|---|---|---|---|---|---|---|---|---|---|---|---|---|---|
| Windows | 0 | 1 | 0 | 0 | 0 | 0 | 0 | 0 | 2 | 0 | 1 | 0 | 1 | 0 | 0 | 0 | 0 | 0 | 0 | 0 | 0 | 0 | 1 | 0 | 0 | 0 | 0 | 0 | 0 | 0 | 0 | 1 | 0 | 1 | 0 | 0 | 1 | 0 | 0 | 0 | 0 | 0 | 0 | 0 | 1 | 2 |
| Mac | 0 | 0 | 0 | 0 | 0 | 0 | 0 | 0 | 0 | 1 | 2 | 0 | 0 | 0 | 0 | 0 | 0 | 0 | 0 | 0 | 0 | 0 | 0 | 0 | 1 | 2 | 0 | 0 | 0 | 0 | 0 | 0 | 0 | 0 | 0 | 0 | 0 | 0 | 2 | 0 | 0 | 0 | 2 | 0 | 0 | 0 |
| Linux | 0 | 0 | 0 | 0 | 0 | 0 | 0 | 1 | 0 | 0 | 0 | 1 | 0 | 0 | 0 | 0 | 0 | 0 | 0 | 0 | 0 | 0 | 1 | 0 | 0 | 1 | 0 | 0 | 0 | 0 | 0 | 1 | 0 | 0 | 0 | 0 | 0 | 0 | 0 | 0 | 0 | 0 | 0 | 0 | 0 | 0 |
Readme
- Source
- raw.githubusercontent.com
SublimeText ♥ reStructuredText
sublime-rst-completion is a group of snippets and commands to facilitate writing restructuredText with SublimeText.
Demo
(image links to a Youtube video)
Install
The easiest way to install is via Sublime Package Control . Just look for "Restructured Text (RST) Snippets"
Otherwise you can:
Clone the repository into your packages folder:
git clone git@github.com:mgaitan/sublime-rst-completion.git
Or download the .zip file and unzip it into your ST2/ST3 packages directory.
Optionally, to use the Render preview feature, you need to install at least one of Pandoc, docutils or rst2pdf and they should be accessible in your PATH. (Copy the command_path variable from the package's settings file to your user settings file and add paths to your local installations to it.) In debian/ubuntu you can install them via apt-get:
$ sudo apt-get install pandoc docutils rst2pdf
Usage
Simple snippets work as tab-triggered shortcuts: type the shortcut and press <TAB> to replace it with the snippet. If the snippet has placeholders, you can jump between them using tab.
| shortcut | result | key binding |
|---|---|---|
| h1 | Header level 1 | see Headers |
| h2 | Header level 2 | |
| h3 | Header level 3 | |
| e | emphasis | ctrl+alt+i (super+shift+i on Mac) |
| se | strong emphasis (bold) | ctrl+alt+b (super+shift+b on Mac) |
| lit or literal | literal text (inline code) | ctrl+alt+k (super+shift+k on Mac) |
| list | unordered list | see Smart Lists |
| listn | ordered list | |
| listan | auto ordered list | |
| def | term definition | |
| code | code-block directive (sphinx) | |
| source | preformatted (:: block) | |
| img | image | |
| fig | figure | |
| table | simple table | ctrl+t see Magic Tables |
| link | refered hyperlink | |
| linki | embeded hyperlink | |
| fn or cite | autonumbered footnote or cite | alt+shift+f see Magic Footnotes |
| quote | Quotation (epigraph directive) |
Also standard admonitions are expanded:
| shortcut |
|---|
| attention |
| caution |
| danger |
| error |
| hint |
| important |
| note |
| tip |
| warning |
Render preview
You can preview your document in different formats converted with different tools pressing ctrl+shift+r.
The Quick Window will offer the format and tool and the result will be automatically open after the conversion.
By the moment, it can use Pandoc, rst2pdf, or rst2*.py tools (included with docutils) to produce html, pdf, odt or docx output formats.
Each time you select a format + tool option, it turns the default the following times.
Note
The original code is from the SublimePandoc project.
Magic Tables
There is a particular magic expansion for tables. Here is how it works:
Grid table
Create some kind of table outline, separating column with two or more spaces:
This is paragraph text *before* the table.

Column 1  Column 2
Foo  Put two (or more) spaces as a field separator.
Bar  Even very very long lines like these are fine, as long as you do not put in line endings here.

This is paragraph text *after* the table.
Put your cursor somewhere in the content to convert as table.
Press ctrl+t, enter (Linux or Windows) or super+shift+t, enter (Mac). The output will look something like this:
This is paragraph text *before* the table.

+----------+---------------------------------------------------------+
| Column 1 | Column 2                                                |
+==========+=========================================================+
| Foo      | Put two (or more) spaces as a field separator.          |
+----------+---------------------------------------------------------+
| Bar      | Even very very long lines like these are fine, as long  |
|          | as you do not put in line endings here.                 |
+----------+---------------------------------------------------------+

This is paragraph text *after* the table.
Now suppose you add some text in a cell:
+----------+---------------------------------------------------------+
| Column 1 | Column 2                                                |
+==========+=========================================================+
| Foo is longer now     | Put two (or more) spaces as a field separator.          |
+----------+---------------------------------------------------------+
| Bar      | Even very very long lines like these are fine, as long  |
|          | as you do not put in line endings here.                 |
+----------+---------------------------------------------------------+
Press the same trigger: magically, the structure will be fixed:
+-------------------+--------------------------------------------------------+
| Column 1          | Column 2                                               |
+===================+========================================================+
| Foo is longer now | Put two (or more) spaces as a field separator.         |
+-------------------+--------------------------------------------------------+
| Bar               | Even very very long lines like these are fine, as long |
|                   | as you do not put in line endings here.                |
+-------------------+--------------------------------------------------------+
In addition, if you would like to keep the column width fixed, you could reflow the table pressing ctrl+t, r (super+shift+t, r in Mac). The result would be this:
+----------+---------------------------------------------------------+
| Column 1 | Column 2                                                |
+==========+=========================================================+
| Foo is   | Put two (or more) spaces as a field separator.          |
| longer   |                                                         |
| now      |                                                         |
+----------+---------------------------------------------------------+
| Bar      | Even very very long lines like these are fine, as long  |
|          | as you do not put in line endings here.                 |
+----------+---------------------------------------------------------+
With the base trigger combination and the cursors you can merge simple cells. For example, suppose you have this table:
+----+----+
| h1 | h2 |
+====+====+
| 11 | 12 |
+----+----+
| 21 | 22 |
+----+----+
Move the cursor to the cell 12 and press ctrl+t, down. You'll get this:
+----+----+
| h1 | h2 |
+====+====+
| 11 | 12 |
+----+    |
| 21 | 22 |
+----+----+
Note
The original code of this feature was taken from Vincent Driessen's vim-rst-tables :
Note
The original code of wcwidth was taken to solve alignment issue with CJK characters.
Simple table
Instead of tables above, a simpler style table is also supported. Here is how it works:
Create some kind of table outline, separating column with two or more spaces:
This is paragraph text *before* the table.

Column 1  Column 2
Foo  Put two (or more) spaces as a field separator.
Bar  Even very very long lines like these are fine, as long as you do not put in line endings here.

This is paragraph text *after* the table.
Put your cursor somewhere in the content to convert as table.
Press ctrl+t, s (Linux or Windows) or super+shift+t, s (Mac). The output will look something like this:
This is paragraph text *before* the table.

==========  ================================================================================================
Column 1    Column 2
==========  ================================================================================================
Foo         Put two (or more) spaces as a field separator.
Bar         Even very very long lines like these are fine, as long as you do not put in line endings here.
==========  ================================================================================================

This is paragraph text *after* the table.
Now suppose you add some text in a cell:
==========  ================================================================================================
Column 1    Column 2
==========  ================================================================================================
Foo is longer now         Put two (or more) spaces as a field separator.
Bar         Even very very long lines like these are fine, as long as you do not put in line endings here.
==========  ================================================================================================
Press the same trigger: magically, the structure will be fixed:
===================  ================================================================================================
Column 1             Column 2
===================  ================================================================================================
Foo is longer now    Put two (or more) spaces as a field separator.
Bar                  Even very very long lines like these are fine, as long as you do not put in line endings here.
===================  ================================================================================================
Note
The original code of this feature was taken from Vincent Driessen's vim-rst-tables :
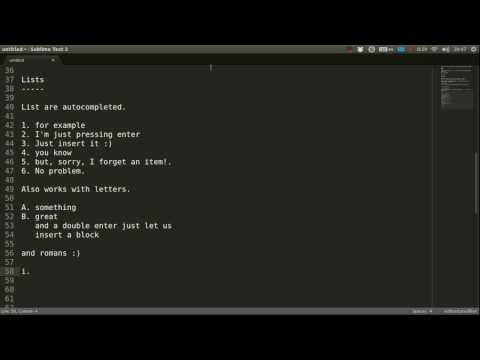
Smart lists
Ordered or unordered lists patterns are automatically detected. When you type something like this:
1. Some item
2. Another|
When press enter the newline will prepended with a logical next item:
...
2. Another
3. |
If you press enter when the item is empty, the markup is erased keeping the same indent as the previous line, in order to allow multilines items. Also note that orderer list works with an alphabetic pattern or roman numbers pattern suffixed with a period (a. b. c. ..., A. B. C. ..., i. ii. iii. iv. ..., X. XI. XII. ..., #.); surrounded by parentheses ((a) (b) (c) ..., (A) (B) (C) ..., (i) (ii) (iii) (iv) ..., (X) (XI) (XII) ..., (#)); or suffixed with a right-parenthesis. (a) b) c) ..., A) B) C) ..., i) ii) iii) iv) ..., X) XI) XII) ..., #));
Tip
The very same feature works for line blocks starting a line with |.
Note
This feature was proudly stolen from Muchenxuan Tongh's SmartMarkdown
Headers
Autocompletion
You can autocomplete standard headers (over/)underlines with TAB.
For example try this:
**********<TAB>
A longer main title
*******
Or this:
A subtitle
---<TAB>
You'll get:
*******************
A longer main title
*******************

A subtitle
----------
respectively.
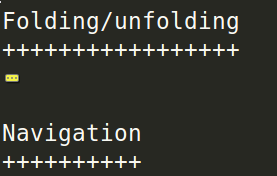
Folding/unfolding
If you put the cursor in a completed header and press shift + TAB (alt + TAB in Mac), the section under it will be folded/unfolded.
For example:
Folding/unfolding
+++++++++++++++++<TAB>

If you put the cursor in a completed header and press ``shift + TAB``,
(``alt + TAB`` in Mac) the section under it will be folded/unfolded.

Navigation
++++++++++

...
Result in:
Nested sections under a header are included.
Navigation
Also, it's possible to jump between headers. alt+down and alt+up move the cursor position to the closer next or previous header respectively.
alt+shift+down and alt+shift+up to the same, but only between headers with the same or higher level (i.e. ignore childrens)
The header level is detected automatically.
Adjust header level
With the cursor in a header, press ctrl + + (plus key) and ctrl + - (minus key) (alt + + and alt + -, in Mac) will increase and decrease the header level respectively. The adornment decoration (underline / overline) are autodetected from the document and uses Sphinx's conventions as default.
For example, you have the cursor in:
Magic Footnotes|
---------------
Which is a header level 2 and want to convert to a level 3, press ctrl + - to get:
Magic Footnotes
+++++++++++++++
|
Magic Footnotes
This is the smarter way to add footnotes, grouping them (and keepping count) in a common region at the bottom of the document.
When you want to add a new note, press alt+shift+f. This will happen:
- A new n+1 (where n is the current footnotes count) note reference will be added in the current cursor position
- The corresponding reference definition will be added at the bottom of the footnotes region
- The cursor will be moved to write the note
After write the note you can go back to the reference with shift+up. Also, if the cursor is just after a reference (i.e: the caret is next to the underscore like this [XX]_| ) you can jump to its definition with shift+down [1].
This feature is based on the code by J. Nicholas Geist for MarkdownEditing
Authors
- Most features added by Martín Gaitán (mgaitan)
- Original idea by Dominic Bou-Samra (dbousamra)
- And some kind contributors
Tip
Pull requests and bug reports are welcome!
License
It's under a BSD license .
| [1] | in fact, you can also jump forward and back between notes with the general alt+shift+f |